Despliegue Apache Hadoop sobre Debian

Despliegue de Apache hadoop sobre Debian con un nodo único.

Esta guía particulariza la instalación sobre un servidor Debian, actualizando las rutas y valores que en la guía original de Hadoop, es necesario cambiar para que funcione.

Instalación de paquetes previos

 sudo apt-get install -y ssh rsync

Instalación de los paquetes propios de Apache Hadoop 2.9 (versión estable:

wget http://apache.uvigo.es/hadoop/common/stable/hadoop-2.9.0.tar.gz ;
# Descomprimir:
tar -xvzf hadoop-2.9.0.tar.gz ;
# Moverlo a /usr/bin
sudo mv hadoop-2.9.0 /usr/bin/hadoop-2.9.0 ;
# Creo un enlace, para no tener que buscar las rutas:
sudo ln -s /usr/bin/hadoop-2.9.0/bin/hadoop /usr/bin/hadoop

Configuración del entorno

Cambiar en la configuración, la ruta donde tengamos en nuestro sistema java.

whereis java; 
medit /usr/bin/hadoop-2.9.0/etc/hadoop/hadoop-env.sh
# set to the root of your Java installation
 export JAVA_HOME=/usr/bin/java

Iniciar Hadoop

Al haber creado ya un enlace durante la instalación, es suficiente con invocar hadoop de la siguiente manera:

hadoop

Desinstalación

rm -rf /usr/bin/hadoop-2.9.0
rm -rf /usr/bin/hadoop

Más información: https://hadoop.apache.org/docs/r2.7.2/hadoop-project-dist/hadoop-common/SingleCluster.html

Getting started with gitlab

Installation for Debian 8

curl -sS https://packages.gitlab.com/install/repositories/gitlab/gitlab-ce/script.deb.sh | sudo bash
sudo apt-get install gitlab-ce

sudo gitlab-ctl reconfigure

https://about.gitlab.com/downloads/#debian8

Restarting gitlab

To restart web service

gitlab-ctl restart
ok: run: gitlab-workhorse: (pid 29291) 0s
ok: run: logrotate: (pid 29299) 1s
ok: run: nginx: (pid 29305) 0s
ok: run: postgresql: (pid 29313) 0s
ok: run: redis: (pid 29327) 1s
ok: run: sidekiq: (pid 29331) 0s
ok: run: unicorn: (pid 29336) 1s

Reconfigure gitlab settings

La configuración de gitlab se guarda en un archivo .yml, que se genera a través de :

emacs /etc/gitlab/gitlab.rb
sudo gitlab-ctl reconfigure

To locate configuration files in our system

find / -name gitlab.rb
find / -name gitlab.yml

Logging

Gitlab logs are separated in three files: application, sidekiq and production

tail -f /var/log/gitlab/gitlab-rails/production.log
tail -f /var/log/gitlab/gitlab-rails/application.log
tail -f /var/log/gitlab/gitlab-rails/sidekiq.log

Code highlighting

For highlighting source code, Gitlab uses Rouge module.

To know whether a language will be coloured or not, they have this awesome website where you can actually test colouring different code snippets.

Available grammars are in Github.

Installing Dataprotector 9 Agents on Debian 8

For some reason, dataprotector agents are released as an ISO image, with a +3000 lines shell script omnisetup.sh.

sudo ./omnisetup.sh -server myserver.myorg.es -install da

This lengthy script install dataprotector clients or server in several architectures:

  • osf1

  • hp-ux

  • SunOs and Solaris

  • AIX,

  • Linux x86, linux ia64

  • sco_sv

  • Darwin

  • PowerPC

For linux, it relays con rpm configuration. For Debian, the way to go would be alien.

Packages needed for Dataprotector agents (DA):

The only packages that are needed for the agents are:

  • OB2-TS-CORE-A.09.00-1.x86_64

  • OB2-CORE-A.09.00-1.x86_64

  • OB2-DA-A.09.00-1.x86_64

So, our first and naive aproach was a conversion with Alien and install them via dpkg -i.

for RPM in *.rpm; do sudo alien -c -k -d --fixperms $RPM; done

This led to an error as this three packages couldn’t be installed because we lacked some util called omnicc.

At this point, I tried running omnicc with bash -x, so that I could see what the long omnisetup was trying to do in my Debian machine.

bash -x ./omnisetup.sh -server myserver.myorg.es -install da

And then I noticed that, though only the above packages were installed, some others were uncompressed and used:

rpm2cpio /usr/local/share/Software_HP_DP_9.00_for_Linux_TD586-15021/linux_x86_64/DP_DEPOT/OB2-CORE-IS-A.09.00-1.x86_64.rpm 

cpio -id ./opt/omni/databases/utils/gpl/x86_64/linux-x86-64/utils.tar

cp ./opt/omni/databases/utils/gpl/x86_64/linux-x86-64/utils.tar .
(...)
rpm2cpio /usr/local/share/Software_HP_DP_9.00_for_Linux_TD586-15021/linux_x86_64/DP_DEPOT/OB2-TS-CFP-A.09.00-1.x86_64.rpm

cpio -id ./opt/omni/databases/vendor/ts_core/gpl/x86_64/linux-x86-64/A.09.00/packet.Z

PacketFullPath=/tmp/omni_tmp/opt/omni/databases/vendor/ts_core
/gpl/x86_64/linux-x86-64/A.09.00/packet.Z

(...)

rpm2cpio /usr/local/share/Software_HP_DP_9.00_for_Linux_TD586-15021/linux_x86_64/DP_DEPOT/OB2-DAP-A.09.00-1.x86_64.rpm

cpio -id ./opt/omni/databases/vendor/da/gpl/x86_64/linux-x86-64/A.09.00/packet.Z

PacketFullPath=/tmp/omni_tmp/opt/omni/databases/vendor/da/gpl/x86_64/linux-x86-64/A.09.00/packet.Z

(...)

At this point, I decided to stick to rpm installation, and use the omnisetup.sh script.

These are the files from the ISO image that we need to distribute to our Debian machines:

linux_x86_64 
│   ├── DP_DEPOT
│   │   ├── gpg-hpPublicKey.pub
│   │   ├── OB2-CFP-A.09.00-1.x86_64.rpm
│   │   ├── OB2-CORE-IS-A.09.00-1.x86_64.rpm
│   │   ├── OB2-DA-A.09.00-1.x86_64.rpm
│   │   ├── OB2-DAP-A.09.00-1.x86_64.rpm
│   │   ├── OB2-TS-CFP-A.09.00-1.x86_64.rpm
│   │   ├── OB2-TS-CORE-A.09.00-1.x86_64.rpm
│   │   └── OB2-TS-CS-A.09.00-1.x86_64.rpm
│   ├── scripts_linux_x86_64
│   │   ├── verify_gpg_lnx.sh
│   │   └── verify_gpg_lnx.sh.sig
│   └── SIG
│   └── DP_DEPOT
│   ├── OB2-CFP-A.09.00-1.x86_64.rpm.sig
│   ├── OB2-CORE-IS-A.09.00-1.x86_64.rpm.sig
│   ├── OB2-DA-A.09.00-1.x86_64.rpm.sig
│   ├── OB2-DAP-A.09.00-1.x86_64.rpm.sig
│   ├── OB2-TS-CFP-A.09.00-1.x86_64.rpm.sig
│   ├── OB2-TS-CORE-A.09.00-1.x86_64.rpm.sig
│   └── OB2-TS-CS-A.09.00-1.x86_64.rpm.sig
├── LOCAL_INSTALL
│   └── omnisetup.sh
├── Readme.txt

Manual installation:

apt-get install -y liblua5.1-0 xinetd rpm2cpio rpm 
sudo ./omnisetup.sh -server myserver.myorg.es -install da

Reconfigure xinetd to serve omni

cat /etc/xinetd.d/dataprotector 

omni stream tcp nowait root /opt/omni/lbin/inet inet -log /var/opt/omni/log/inet.log

Puppet installation

I am proud to present my own dataprotectoragent puppet module to avoid manual installation of this agent

puppet module install esterniclos-dataprotector agent

class {"dataprotectoragent":
      dataprotectorserver => "dataprotector.my.com",
    }

Available from

Troubleshooting

During this project, I encountered The package needs to be reinstalled, but I can’t find an archive for it error, and, luckily,  IhaveaPC awesome tutorial to get rid of it.

Vmware 6 ESXi host installation

Mount Iso image through Ilo. In this case, we are installing on a HP blade, so we are using ILO device to mount virtual CD.

esx6.install004

Boot from CD and run installer.


esx6.install005

F11 to accept license agreement

esx6.install002

Select disk to install. I our case, we use a 6 GB datastore to boot from disk. This allows us to change easily blades and keep server configuration untouched.

BTW, this blades were cheaper to buy as they have no disks.
esx6.install006

Wait for installer to end

esx6.install001

Boot.

First boot configuration

Vmware Esxi 6.0 tries to auto configure network.

esx6.config001

If DHCP is not present, static network settings have to be configured manually.

esx6.config002

VLAN:

esx6.config004Ipv4

esx6.config005

DNS server

esx6.config006

DNS suffix

esx6.config007

Add to vcenter inventory

If its a reinstallation, ssl certificates will have changes and a warning will show up.

esx6.config003

Stage patches

Using vmware update manager

esx6.vum.001This will lead to a server reboot.

Extra Drivers

For some reason, we have still to add HP drivers for our servers. Via ssh

esxcli software vib install -v  /vmfs/volumes/..../lpfc-10.5.70.0-1OEM.600.0.0.21
59203.x86_64.vib

Installation Result
   Message: The update completed successfully, but the system needs to be rebooted for the changes to be effective.
   Reboot Required: true
   VIBs Installed: EMU_bootbank_lpfc_10.5.70.0-1OEM.600.0.0.2159203
   VIBs Removed: Emulex_bootbank_lpfc_10.2.340.18-1OEM.550.0.0.1331820
   VIBs Skipped:

Apply host profile

Last reboot and host is ready to go!

Replace Github-linguist with source github version

First of all, we need to locate our github-linguist files which will be replaced. We will also need ruby-build and gcc.

find / -name languages.yml
apt-get install ruby-build gcc
ruby-build 2.1.0 /opt/gitlab/embedded/service/gem/ruby/2.1.0
cd /opt/gitlab/embedded/service/gem/ruby/2.1.0/gems/
wget https://github.com/github/linguist/archive/v4.7.5.tar.gz
tar -xvzf v4.7.5.tar.gz
mv linguist-4.7.5/ github-linguist-4.7.5
rm -f v4.7.5.tar.gz
# Install all ruby dependencies
bundle install

Generate samples.json:

After download from github,

bundle exec rake check_samples

Otherwise, we will face this error in logs

2016-03-30_07:49:38.08294 No such file or directory @ rb_sysopen - /opt/gitlab/embedded/service/gem/ruby/2.1.0/gems/github-linguist-4.7.5/lib/linguist/samples.json

Fetch all ace modes

bundle exec rake fetch_ace_modes

Problems with bundle install

gem install byebug -v '8.2.2'
mkmf.rb can't find header files for ruby at /usr/lib/ruby/include/ruby.h

Solved

apt-get install ruby-dev

When running bundle install, charlock_holmes would not be installed

gem install charlock_holmes -v '0.7.3'
(..)
checking for main() in -licui18n... no

Solved

apt-get install libicu-dev

We also had problems with rugged

gem install rugged -v '0.24.0'
(..)
checking for gmake... no
checking for cmake... no
checking for pkg-config... no
ERROR: CMake is required to build Rugged.

Solved

apt-get install cmake pkg-config
ln -s /usr/bin/make /usr/bin/gmake


Vmware: Instalación de parches de servidor

VMWare ESXi
VMWare ESXi

Instalación de parches con powershell

Es necesario descargar el parche en local, y descomprimirlo.

Connect-ViServer host1.myorg.org
$host | Install-VMHostPatch -LocalPath ESXi550-201502001/metadata.zip

Instalación de parches por ssh

Activar ssh vía cli

$host = Start-VMHostService -HostService ($_ | Get-VMHostService | Where { $_.Key -eq "TSM-SSH" } )

Vía ssh:

vim-cmd hostsvc/maintenance_mode_enter
esxcli software vib install -d "/var/tmp/ESXi550-201502001.zip"
esxcli software vib list
vim-cmd hostsvc/maintenance_mode_enter

Instalación de servidor puppet sobre Centos

puppet labs

Objetivos

Puppet server y puppet-dashboard.

Sistemas base

Centos 7

Instalación de puppet master:

Hemos seguido el tutorial de sotoca.es

yum install -y puppet-server
puppet resource service puppetmaster ensure=running enable=true

Para ver que el servicio estaba verdaderamente ejecutando:

systemctl list-unit-files

Instalando puppet dashboard

En el momento de hacer este tutorial, no están aún disponibles los paquetes de puppet-dashboard para centos7. Tampoco están disponibles los paquetes de ruby-mysql para Centos 7, lo que nos deja en este punto, atentos a su salida.

La idea sería añadir el nuevo repositorio de paquetes de puppet labs e instalar con yum

rpm -ivh puppetlabs-release-7-11.noarch.rpm
 yum install -y puppet-dashboard

Puppet: Instalación de servidor en debian

Captura

Es la segunda vez que nos enfretamos al reto de construir un servidor puppet, esta vez sobre un servidor Debian.

Recomendamos leer how puppet works

Consideraciones iniciales

No vamos a usar una configuración asociada a un git. Vamos a usar un puppet master.

Nuestro objetivo será mantener igual en todos los equipos de nuestra infraestructura los siguientes elementos:

  • Configuración de usuarios de apache
  • Configuración GLPI
  • Certificados SSH de cliente
  • Configuración snmp

Instalación base de servidor

Debian Versión 7.7

/etc /apt/sources.list

deb http://ftp.es.debian.org/debian/ wheezy main contrib non-free
deb-src http://ftp.es.debian.org/debian/ wheezy main contrib non-free

deb http://security.debian.org/ wheezy/updates main contrib non-free
deb-src http://security.debian.org/ wheezy/updates main contrib non-free

deb http://ftp.es.debian.org/debian/ wheezy-updates main contrib non-free
deb-src http://ftp.es.debian.org/debian/ wheezy-updates main contrib non-free
deb http://backports.debian.org/debian-backports squeeze-backports main


Instalación puppet en servidor

apt-get install puppetmaster puppetmaster-passenger

Al instalar passenger, hemos tenido un problema con apache y sus logs.

no listening sockets available, shutting down
 Unable to open logs

Hemos cambiado los permisos del directorio de apache, para que ya pueda iniciar.

chown www-data:www-data /var/log/apache2

Y hemos reiniciado, por que no había nada en el puerto 80.

Instalación de puppet-dashboard en servidor

Hemos seguido al pie de la letra el tutorial de wiki.debian.org, pero hemos tenido algún problemilla más:

:~# tail /var/log/apache2/dashboard.example.com_error.log
 (...) Directory index forbidden by Options directive: /usr/share/puppet-dashboard/public/
 

Para resolverlo hemos tenido que cambiar la configuración de apache para el servidor de puppet-dashboard.

Una consideración inicial, es que hemos optado por que la configuración de este servidor, sea, por defecto el puppet dashboard. Es decir, al entrar en el raíz del servidor, por el puerto 80, saldrá directamente puppet dashboard.

# /etc/apache2/sites-enabled/puppet-dashboard

<VirtualHost *:80>
        ServerName miservidor.com
        DocumentRoot /usr/share/puppet-dashboard/public/
        <Directory /usr/share/puppet-dashboard/public/>
                Options -Indexes +FollowSymLinks MultiViews
                Order allow,deny
                allow from all
        </Directory>

        PassengerHighPerformance on
        PassengerMaxPoolSize 12
        PassengerPoolIdleTime 1500
        PassengerStatThrottleRate 120
        RailsAutoDetect On
  ErrorLog /var/log/apache2/dashboard.example.com_error.log
  LogLevel warn
  CustomLog /var/log/apache2/dashboard.example.com_access.log combined
  ServerSignature On
</VirtualHost>

Configuramos también settings.yml:

[root@server~]# grep ca_server /etc/puppet-dashboard/settings.yml
ca_server: 'server.org'

En el fichero de configuración de puppet, especificamos la url donde queremos que queden los reports

[master]
    report=true
    reports = store, http
    reporturl = http://servers/reports/reports/upload

Al poner puppet dashboard en el puerto 80, y no en el 3000 que es lo normal, hemos tenigo qeu cambiar /opt/puppet-dashboard/bin/external_node

DASHBOARD_URL = http://localhost

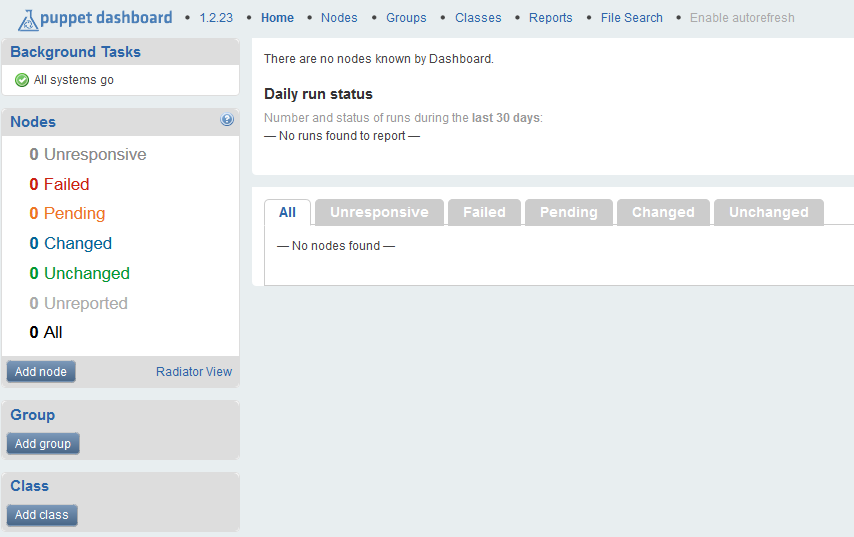
Esta es la vista del servidor web


puppet-dashboard-01

Ejecutar puppetmaster:

 /etc/init.d/puppetmaster start

Si nos da este error:

 service puppet-dashboard start
[warn] Starting Puppet Dashboard:[....] Not starting Puppet Dashboard, disabled via /etc/default/puppet-dashboard ... (warning).
. ok

Editar /etc/default/puppet-dashboard-workers:

###START=no
START=yes

Colorear en emacs puppet

[root@server puppet]# apt-get install puppet-el

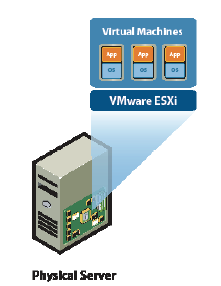
Instalación de agentes puppet en cliente: Facter y puppet

Facter es el componente de cliente encargado de mostrar la información de cada máquina. Se debe instalar en cada máquina que vayamos a gestionar con puppet.

apt-get install -y puppet facter

Prueba de comunicación con el servidor:

root@client:~# puppet agent --server puppet.server.com --no-daemonize --verbose

En la primera ejecución, se crea un certificado que tenemos que firmar en el servidor. Podéis revisar slashdot.in para más información.

[root@server~]#  puppet cert  --list
 "client.org" (...)
 [root@server~]# puppet cert--sign client.org


Actualización F5 Big IP 11.3.0 HF 8

La descarga de imágenes se hace desde la web de F5:

https://downloads.f5.com/esd/product.jsp?sw=BIG-IP&pro=big-ip_v11.x&ver=11.3.0

Hotfix-BIGIP-11.3.0-3144.0-HF8 11.3.0 HotFix 10/14/2013 Hotfix-BIGIP-11.3.0-3144.0-HF8
11.3.0 11.3.0 Release 12/17/12 11,3,0

Dado que en F5 no se distinguen por su madurez al sacar versiones, hemos optado por pasar de una 11.2.1 a una 11.3.0 con HF8. Existen versiones más recientes, pero de hace sólo 15 días.

Se suben las imágenes al equipo a actualizar, en una partición no utilizada:


Del mismo modo, se sube el hotfix

Si queremos actualizar por la interfaz web, selecionamos install y la partición que vamos a utilizar. Debe ser una que no esté ya en uso

Se instala también el HF:

Si queremos actualizar por tmsh, una vez subidas las imágenes, podemos aplicarlas sobre un volumen existente:

Por tmsh, se instala en un volumen existente

admin@f5pre(Standby)(/Common)(tmos)# install sys software image BIGIP-11.3.0.2806.0.iso volume HD1.2

 O, sobre un volumen nuevo:

admin@f5pre(Standby)(/Common)(tmos)# install sys software image BIGIP-11.3.0.2806.0.iso volume HD1.4 create-volume

En caso de tener varios nodos, es necesario que estén en la misma versión, para mantener el grupo de device.


Instalar check_mssql_health como plugin de nagios en CentOS 6

El objetivo de check_mssql_health es monitorizar las bases de datos internas a un sql server desde nagios, centreon o similar.

La conexión, se hace desde el monitor (nagios) hacia la base de datos, directamente por el puerto de base de datos. Por defecto, en las instalaciones MS SQL SERVER es 1433. En caso de no funcionar, habrá que revisar que no haya un cortafuegos (tanto de windows como físico) que corte el puerto 1433 entre el monitor y el SQL Server.

Instalación del check en CentOS 6

Descargar el paquete

Descomprimir, configurar e instalar:

   tar -xvzf check_mssql_health-1.5.19.1.tar.gz

cd check_mssql_health-1.5.19.1

./configure

./make

./make install

El directorio donde deja el script, no coincide con el directorio donde están los plugins en nagios sobre CENTOS. Por lo tanto, es importante moverlo:

mv /usr/local/nagios/libexec/check_mssql_health /usr/lib64/nagios/plugins/

Problema DB:Sybase

Al ejecutar mssql_health faltan  paquetes de perl:

> ./check_mssql_health –hostname host  –username nagios –password dkfjlskf –mode  database-online
CRITICAL – cannot connect to host . install_driver(Sybase) failed: Can’t locate DBD/Sybase.pm in @INC (@INC contains: . /usr/local/lib64/perl5 /usr/local/share/perl5 /usr/lib64/perl5/vendor_perl /usr/share/perl5/vendor_perl /usr/lib64/perl5 /usr/share/perl5) at (eval 17) line 3.
Perhaps the DBD::Sybase perl module hasn’t been fully installed,
or perhaps the capitalisation of ‘Sybase’ isn’t right.
Available drivers: DBM, ExampleP, File, Gofer, Proxy, SQLite, Sponge, mysql.
at ./check_mssql_health line 3045.

Instalamos perl-DBD-Sybase con yum:

 yum install perl-DBD-Sybase.x86_64 -y

Comando de nagios /etc/nagios/checkcommands.cfg


define command{
command_name                    check_mssql_health
command_line                    $USER1$/check_mssql_health –hostname $HOSTADDRESS$  –username $ARG1$ –password $ARG2$ –mode  database-online
;command_example                        !nagios!password
;$ARG1$                         Service
}